
Table of Contents
TogglePanel wall decor has moved from luxury hotels and commercial spaces into everyday homes, and for good reason. It adds depth, texture, and visual weight to flat walls without the commitment of wallpaper or the mess of intricate tile work. Whether it’s the warm appeal of wood shiplap or the geometric drama of 3D textured panels, dimensional wall treatments create focal points that paint alone can’t achieve. They’re approachable for most DIYers, scalable to any budget, and forgiving enough that mistakes don’t mean starting over from scratch. This guide walks through what panel wall decor is, how to pick the right type for a space, and how to install it with confidence.
Key Takeaways
- Panel wall decor adds depth and texture to any room while hiding imperfections and working with most DIY skill levels, without requiring specialized tools or professional installation.
- Wood shiplap and 3D textured panels are the most popular options, with shiplap ideal for rustic and farmhouse styles while geometric panels suit modern and minimalist interiors.
- Proper prep work—including wall acclimation, level marking, and accurate measurements—prevents costly mistakes and ensures panels install seamlessly with minimal gaps or buckling.
- Moisture-prone areas like bathrooms and kitchens require sealed wood or moisture-tolerant PVC and foam panels to prevent warping, while renters should choose peel-and-stick or adhesive-only installations for removability.
- Finishing touches like caulking seams, filling fastener holes, and applying primer plus two finish coats transform panel wall decor from simple texture into a professionally polished design element.
What Is Panel Wall Decor and Why Is It Trending?
Panel wall decor refers to any material applied to a wall surface to create dimension, pattern, or texture, beyond a simple coat of paint. It includes everything from reclaimed wood planks and MDF wainscoting to PVC 3D tiles and acoustic foam panels. Unlike wallpaper, which relies on printed pattern, panels introduce actual shadow lines and relief.
The trend took off in part because of social media, platforms showcasing accent walls and budget home makeover projects made dimensional design accessible to renters and first-time homeowners. But the practical benefits matter just as much. Panels can hide imperfect drywall, dampen sound in open-concept spaces, and add perceived value during resale. They also offer flexibility: most panels install with adhesive, brad nails, or a combination of both, so they don’t require specialized tools or a crew.
Another driver is material innovation. Lightweight PVC and polyurethane foam panels now mimic the look of carved plaster or stone at a fraction of the weight and cost. That means a homeowner can add a coffered ceiling effect or waffle-grid wall without structural reinforcement or hiring a finish carpenter. As of 2026, the category includes peel-and-stick options thin enough for renters to remove without damaging drywall, a big shift from the permanent installations of the past.
Types of Panel Wall Decor for Every Style
Wood Panels and Shiplap
Solid wood planks, shiplap, and tongue-and-groove boards remain the most popular choice for rustic, farmhouse, and transitional interiors. Shiplap, boards with a rabbet joint that creates a small reveal between planks, became shorthand for the style, but true shiplap is only one profile among many. Nickel-gap (a ⅛” reveal) and V-groove tongue-and-groove are common alternatives.
Most shiplap is milled from pine, cedar, or poplar in nominal 1×6 or 1×8 sizes (actual dimensions ¾” × 5½” or ¾” × 7¼”). Wider boards cover more area with fewer seams but show seasonal wood movement more noticeably. For stability and cost control, many DIYers turn to MDF shiplap, which comes primed and doesn’t expand or contract with humidity. It’s heavier than solid wood and will swell if it gets wet, so it’s not suitable for full bathrooms unless sealed properly.
Installation typically involves finding studs, snapping level lines, and nailing boards horizontally with a brad nailer or finish nails. Starting at the bottom and working up ensures each board supports the next. Corners and outlets require coping cuts, a miter saw or coping saw handles those cleanly. Paint-grade shiplap gets caulked at seams and nail holes filled: stain-grade installs leave the gaps open for a more organic look. Expect to pay $1.50–$4 per linear foot for pine shiplap, more for premium species or prefinished options.
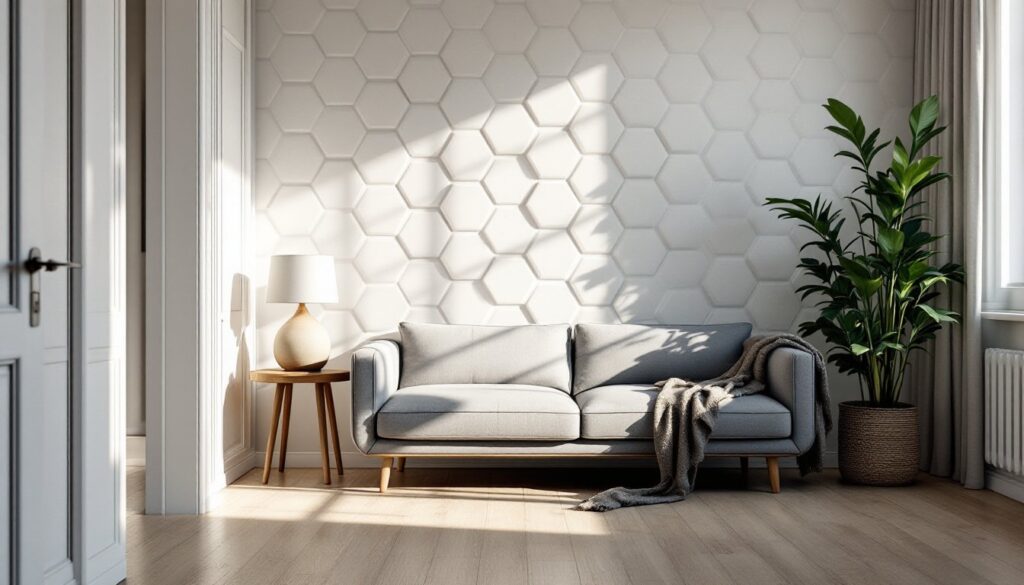
3D Textured Panels
3D wall panels use geometric patterns, waves, cubes, hexagons, or organic ridges, to create sculptural relief. Materials range from MDF and gypsum to PVC, plant fiber, and polyurethane foam. The latter two are lightweight enough to install with construction adhesive alone, no nailing required.
These panels shine in modern, minimalist, and contemporary home decor settings where clean lines and bold texture replace ornament. A single accent wall behind a bed or sofa draws the eye without overwhelming a room. Because the panels are modular, typically 19¾” × 19¾” squares or 23⅝” × 23⅝” rectangles, layout becomes a grid exercise. Measure the wall, mark center lines, and work outward to keep the pattern symmetrical.
PVC and foam panels can be painted with latex or acrylic paint after priming, though many come prefinished in white or gray. Gypsum and MDF panels often arrive raw and need a coat of primer before topcoat. Some textured panels also function as acoustic dampening, useful in home offices or media rooms where echo is a problem. For that application, look for panels with an NRC rating (Noise Reduction Coefficient) above 0.5.
Installation on drywall is straightforward: apply panel adhesive in a zigzag pattern, press into place, and hold for 30 seconds. For plaster walls or surfaces that aren’t perfectly flat, adding a few finish nails or screws ensures full contact. Seams between panels can be left visible for a tiled look or filled and sanded for a seamless effect. Budget $8–$25 per panel, depending on material and complexity.
How to Choose the Right Panel Wall Decor for Your Room
Start by considering ceiling height and wall proportions. Horizontal shiplap makes low ceilings feel even lower unless it’s painted the same color as the ceiling to blur the boundary. Vertical planks add height but can feel busy in narrow hallways. Grid-based 3D panels work well in square or rectangular rooms: irregular layouts may require custom cuts that waste material.
Moisture and durability matter in kitchens, bathrooms, and basements. Solid wood and MDF will warp or mold in high-humidity areas unless they’re sealed with polyurethane or marine-grade varnish. PVC and foam panels tolerate moisture better and are lighter, but they can’t be stained, only painted. If the room sees heavy wear (mudroom, kids’ playroom), choose a harder material or plan to repaint periodically.
Color and finish influence how much texture reads. Matte or satin sheens emphasize shadow lines: high-gloss paint reflects light and flattens the effect. Dark colors deepen dimension but absorb light, so they’re best on accent walls with good natural or task lighting. Light neutrals keep things airy but may require more coats to hide seams and fasteners.
Consider the existing trim and architectural style. Shiplap pairs naturally with baseboards and crown molding in craftsman or cottage-style homes. Modern 3D panels look cleanest in spaces with minimal trim or flat casing. Mixing styles, say, rustic wood panels with sleek metal fixtures, can work, but it requires intention. When in doubt, match the panel finish to existing woodwork or keep everything in the same color family.
Finally, think about removability. Renters or those planning a near-term move should favor adhesive-only installs with peel-and-stick panels or lightweight foam squares. Homeowners doing long-term updates can use nails or screws into studs for a permanent bond. If resale is a priority, stick to neutral tones and classic profiles, potential buyers may not share a taste for bold geometric patterns.
Installing Panel Wall Decor: DIY Tips and Best Practices
Prep the wall first. Panel installation magnifies imperfections, so patch any holes with spackle or joint compound, sand smooth, and prime if the wall is raw drywall or a bold color that might bleed through. Remove outlet and switch covers: if panels will sit flush with boxes, install box extenders to bring receptacles forward. Turn off power at the breaker before working around electrical.
Acclimate materials for 48 hours in the room where they’ll be installed, especially wood products. Humidity and temperature swings cause expansion and contraction: skipping acclimation leads to gaps or buckling weeks after install.
Layout and measurement prevent costly mistakes. For horizontal shiplap, use a level and chalk line to mark the starter course. Measure wall height and divide by board width (plus reveal) to see if the top course will be a narrow sliver, if so, rip the bottom or top course to even things out. For 3D panels, find the wall’s center point and snap vertical and horizontal lines: this keeps the pattern balanced even if walls aren’t perfectly square.
Cutting and fastening: A miter saw with a fine-tooth blade gives clean cuts on wood and MDF. For PVC and foam, a utility knife with multiple passes works, or a miter saw at slow speed to prevent melting. When nailing into studs, use an 18-gauge brad nailer with 1¼” or 1½” brads, long enough to grab the stud but short enough not to split thin material. Adhesive-only installs need panel adhesive or construction adhesive rated for the panel weight: apply in a serpentine bead and press firmly.
Safety and tools: Wear safety glasses when cutting, especially with a miter saw throwing chips. A dust mask is essential for MDF, which produces fine particles. Ear protection matters if running a saw for extended periods. Keep a stud finder, tape measure, pencil, and carpenter’s square within reach. A coping saw or oscillating multi-tool handles outlet cutouts and inside corners.
Finishing touches: Fill nail holes with wood filler (for stain-grade) or spackle (for paint-grade). Caulk seams where panels meet trim, ceiling, or adjacent walls with paintable acrylic caulk, this hides gaps and allows for slight movement. If painting, apply one coat of primer followed by two coats of finish paint. For rooms showcasing interior design ideas with bold color, consider a sample board first to see how the texture interacts with the hue under your lighting.
Panel wall decor doesn’t require a contractor’s skill set, but it does demand patience and attention to detail. Measure twice, cut once, and don’t rush the layout stage. The result is a wall with presence, one that changes how light moves through a room and how the space feels underfoot.
Conclusion
Panel wall decor bridges the gap between quick cosmetic updates and full-scale renovation. It’s tactile, versatile, and within reach for most DIYers willing to invest a weekend and some careful planning. Whether the goal is farmhouse warmth or modern edge, the right panels, installed with attention to prep and detail, deliver a finish that flat paint simply can’t match.