
Table of Contents
ToggleKitchen walls catch grease splatters, steam clouds, and the occasional tomato sauce explosion, yet most homeowners treat them as an afterthought. That’s a missed opportunity. A well-designed kitchen wall can anchor your design scheme, expand visual space, and even improve functionality. Whether you’re working with a blank backsplash, open wall above cabinets, or a full dining nook surface, intentional decor choices make the room feel cohesive and finished. This guide covers practical approaches to kitchen wall treatments, from style-specific looks to DIY-friendly projects and material selection that holds up in a high-moisture, high-traffic environment.
Key Takeaways
- Kitchen decor wall treatments serve dual purposes by adding both style and functionality, such as open shelving for storage or tile backsplashes for easy cleanup and protection from splatters.
- Proper surface preparation with a degreaser like TSP is essential before painting or installing kitchen wall decor, as grease and cooking oils can cause paint to peel and adhesives to fail within months.
- Choose durable materials for kitchen walls including satin or semi-gloss paint, porcelain tile, sealed wood planks, or waterproof vinyl alternatives that can withstand moisture, heat, and frequent cleaning.
- Popular kitchen wall decor styles—from farmhouse shiplap and open shelving to modern large-format tiles and minimalist slab backsplashes—should complement your existing cabinetry and countertops rather than compete with them.
- DIY-friendly kitchen wall projects like magnetic chalkboards, pallet wood accent walls, and plate displays let you customize your space affordably while intermediate projects like hexagon tile feature walls create dramatic focal points.
- Always prioritize safety by wearing protective gear (safety glasses, dust masks, nitrile gloves) and ensuring proper ventilation when cutting materials or applying sealers in your kitchen wall installation.
Why Your Kitchen Walls Deserve More Attention
Kitchens generate more wear than nearly any room in the house. Cooking introduces airborne grease, humidity from boiling water, and temperature swings that affect adhesives, paint, and finishes. That’s exactly why the walls need more than contractor-grade flat white.
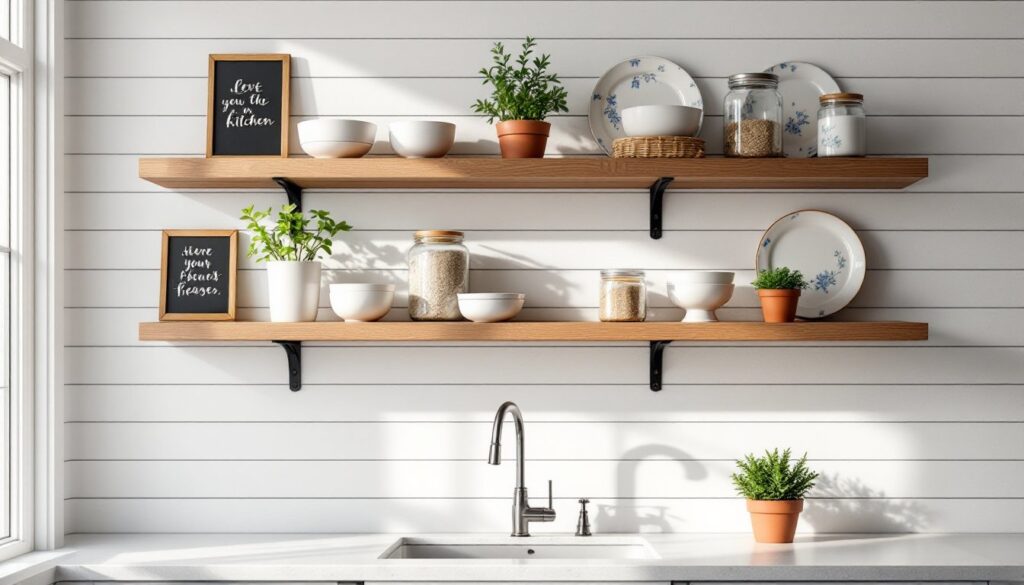
Functional wall decor serves dual purposes. Open shelving or magnetic knife strips add storage while filling vertical space. Tile backsplashes protect drywall from splatter and simplify cleanup. Even framed art or metal wall panels can define zones in open-concept layouts, drawing the eye away from cluttered countertops.
From a design perspective, kitchen walls anchor your color palette and material choices. A subway tile backsplash with dark grout creates visual rhythm. Reclaimed wood plank walls warm up sterile white cabinets. The wall treatment often becomes the room’s focal point, especially in kitchens lacking a standout range hood or island.
Don’t skip the prep work. Grease and cooking oils migrate onto walls, even several feet from the stove. Clean surfaces with a degreaser like TSP (trisodium phosphate) before painting or installing decor. For persistent grime, a solution of warm water and dish soap works, but TSP cuts through built-up residue on older walls. Skipping this step causes paint to peel and adhesives to fail within months.
Popular Kitchen Wall Decor Styles to Match Your Home
Choosing a style starts with your existing cabinetry, countertops, and flooring. The wall treatment should complement, not compete with, those elements.
Farmhouse and Rustic Kitchen Wall Decor
Shiplap, barn wood accent walls, and open shelving with metal brackets define farmhouse kitchens. Real wood planks (tongue-and-groove pine or reclaimed barn siding) offer texture but require sealing in high-moisture areas. Use a water-based polyurethane or tung oil finish to prevent warping near sinks and dishwashers.
For a budget-friendly alternative, consider MDF shiplap primed for paint. It’s dimensionally stable, costs roughly $0.50 per linear foot, and installs with a brad nailer and construction adhesive. Paint it matte white or greige to let the shadow lines create depth.
Accessorize with galvanized metal signs, wire baskets, or a pegboard painted to match trim color. Pegboard (¼-inch tempered hardboard with evenly spaced holes) mounts to 1×2 furring strips to create clearance for hooks. It’s practical for hanging utensils, cutting boards, or small pots, and you can rearrange the layout without new nail holes. Many home design platforms showcase farmhouse kitchens that balance rustic textures with clean lines.
Modern and Minimalist Wall Treatments
Modern kitchens favor large-format tiles (12×24-inch or bigger), slab backsplashes, and monochromatic paint. A single slab of quartz or porcelain running floor-to-ceiling behind the range eliminates grout lines and simplifies cleaning. Expect to pay $60–$150 per square foot installed, depending on material and fabrication complexity.
If slab work exceeds your budget, rectified porcelain tiles with minimal grout joints (⅛-inch spacing) mimic the look. Use large-format trowels (½×½-inch notch) for proper adhesive coverage and leveling spacers to avoid lippage on tiles over 15 inches.
Floating shelves in powder-coated steel or thick hardwood (1½–2 inches) provide display space without visual clutter. Mount them to studs with heavy-duty shelf brackets rated for at least 50 pounds per pair. In modern kitchens, less is more, three well-styled shelves beat a gallery wall of mismatched frames.
Creative DIY Kitchen Wall Decor Projects
Hands-on projects let you customize walls without contractor pricing. These options suit intermediate DIYers comfortable with basic carpentry and surface prep.
Magnetic Chalkboard Wall: Apply magnetic primer (two coats) followed by chalkboard paint (two coats) on a section of wall. Magnetic primer contains iron particles, so stir continuously and apply with a dense foam roller to avoid streaks. The finished surface holds magnets for shopping lists and accepts chalk. Seal chalkboard paint with a clear topcoat if you want a low-dust finish. This works best on a wall section between upper and lower cabinets, typically 18–24 inches tall.
Pallet Wood Accent Wall: Source heat-treated pallets (stamped HT, not chemically treated MB). Disassemble with a reciprocating saw or pry bar, then sand to remove splinters. Cut planks to length with a miter saw or circular saw and attach to wall studs using 2-inch finish nails or a pneumatic nailer. Vary plank widths for visual interest. Finish with satin polyurethane or leave raw for a weathered look. Note: untreated wood can absorb odors in kitchens, so sealing is recommended.
Plate Wall Display: Arrange decorative plates or vintage dishware on a wall adjacent to the dining area. Use plate hangers with coated wire (to avoid scratching) or adhesive disc hangers for lightweight pieces. Lay out the arrangement on the floor first, then transfer measurements to the wall with painter’s tape. Anchor hangers into drywall anchors rated for 10–15 pounds if studs aren’t available. According to design resources like The Kitchn, plate walls add color and pattern without occupying counter space.
Hexagon Tile Feature Wall: Hexagonal tiles (4–6 inches across) create geometric interest. They’re more labor-intensive than square tiles due to layout complexity, but the result stands out. Start with a level horizontal line at your base point, then work upward in offset rows. Use tile spacers and frequently check plumb with a 4-foot level. Apply thinset mortar with a ¼×¼-inch notched trowel for tiles under 8 inches. Grout with epoxy grout for superior stain resistance in kitchens.
Choosing the Right Materials for Kitchen Walls
Material selection determines longevity and maintenance. Kitchens demand surfaces that tolerate moisture, heat, and repeated cleaning.
Paint: Use satin or semi-gloss acrylic latex in kitchens. These sheens resist moisture better than flat paint and wipe clean with a damp cloth. Primer is non-negotiable on bare drywall or previously stained surfaces, stain-blocking primer prevents bleed-through from grease or smoke damage. Coverage averages 350–400 square feet per gallon, but textured walls or dark colors may require a second coat.
Tile: Porcelain and glazed ceramic are top choices for backsplashes and full-wall applications. Porcelain is denser (water absorption under 0.5%) and more durable, making it ideal behind stoves. Glass tile adds reflective shimmer but shows fingerprints and requires careful cutting with a wet tile saw to avoid chipping. Natural stone (marble, travertine) needs yearly sealing to prevent staining from acidic foods.
Wood and Wood Alternatives: Real wood planks bring warmth but need protection. Tongue-and-groove pine or shiplap should be sealed with water-based polyurethane (3 coats, sanding between each with 220-grit paper). Vinyl plank flooring can double as wall cladding, it’s waterproof, installs with adhesive or interlocking edges, and costs $2–$5 per square foot. Cut with a utility knife and straight edge.
Beadboard and Paneling: MDF beadboard panels (4×8 sheets with vertical grooves) install quickly and paint well. Attach to studs with panel adhesive and 18-gauge brad nails every 12 inches. They’re not waterproof, so keep them at least 6 inches away from sinks or stoves. PVC beadboard costs more ($30–$50 per sheet) but handles moisture without swelling.
Wallpaper: Modern vinyl-coated or non-woven wallpapers labeled “scrubbable” tolerate light moisture and cleaning. Apply them to walls away from direct splatter zones. Use wallpaper paste rated for vinyl (some patterns come pre-pasted). Match patterns carefully at seams, a wallpaper smoother and seam roller prevent bubbles and lifting edges.
Safety note: Always wear safety glasses when cutting tile or wood, dust masks (N95 or better) when sanding, and nitrile gloves when handling adhesives or sealers. Ensure adequate ventilation when using solvent-based products.
Conclusion
Kitchen walls aren’t passive backdrops, they define the room’s character and take daily punishment from heat, grease, and moisture. Choosing durable materials, prepping surfaces properly, and matching your decor to the kitchen’s style ensures walls that look intentional and last years. Tackle projects within your skill range, and don’t hesitate to call in a tile setter or electrician when a job demands it.