
Table of Contents
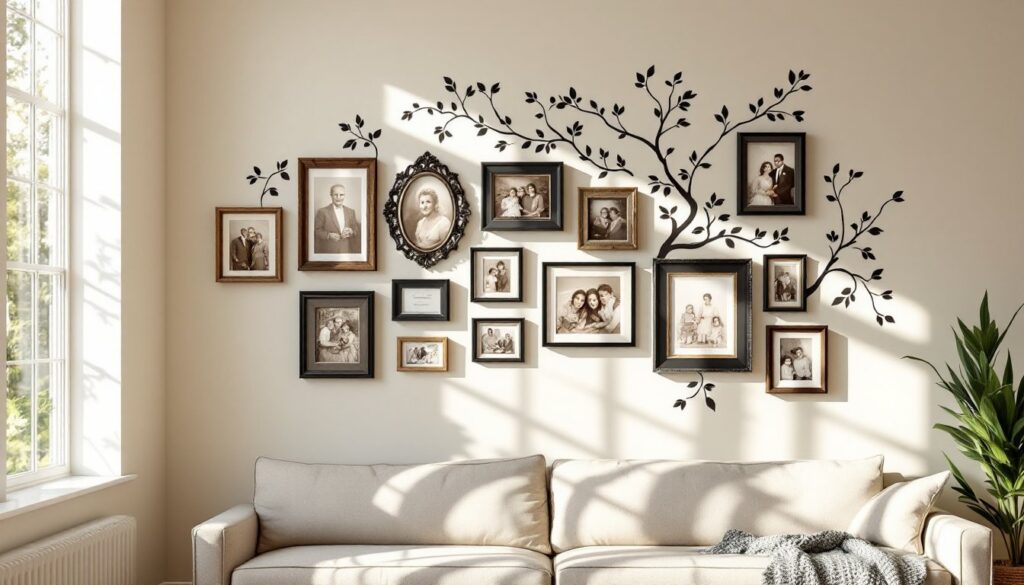
ToggleFamily tree wall decor turns genealogy into a living design element. Instead of photo albums collecting dust in a closet, these displays transform ancestors and relatives into focal points that spark conversation and connect generations. Whether it’s a gallery wall of vintage portraits, a vinyl decal with branch silhouettes, or a DIY wooden tree with hanging frames, the right setup adds both personal meaning and visual interest to a room. The challenge lies in balancing aesthetic appeal with practical execution, choosing materials that won’t damage walls, planning a layout that scales properly, and building something sturdy enough to last.
Key Takeaways
- Family tree wall decor transforms genealogy into a meaningful design statement that sparks conversation, connects generations, and works seamlessly in traditional or modern homes.
- Gallery walls with consistent 2-3 inch spacing, shadow boxes, and vinyl decals are the most popular family tree wall decor formats, each offering different levels of commitment and flexibility.
- Proper planning—including wall measurements, stud location mapping, and layout sketching on graph paper—prevents installation mistakes and protects irreplaceable family photos from damage.
- Use acid-free mats, UV-protective glass, and appropriate wall anchors (20+ pounds rated for drywall) to ensure your family tree display lasts without fading, yellowing, or falling.
- DIY options like pallet wood trees, rope displays, wooden dowels, and branch sculptures offer budget-friendly customization that accommodates family growth while avoiding high-humidity areas like bathrooms.
- Position your family tree at standard gallery height (57-60 inches from the floor) in high-visibility spots like living room walls, staircase walls, or hallways for maximum impact and preservation.
Why Family Tree Wall Decor Makes a Meaningful Design Statement
Unlike generic wall art, family tree displays carry personal history. They anchor a room with authenticity that mass-produced prints can’t replicate. A well-executed family tree becomes a conversation starter, guests ask about the faces, the stories, the connections. For families with kids, it’s a visual reminder of where they come from, offering context that school history lessons rarely provide.
From a design standpoint, family trees offer flexibility. They work in traditional homes with ornate frames and vintage sepia-toned photos, or in modern spaces with minimalist layouts and clean typography. The modular nature, adding new photos as the family grows, makes them more dynamic than static artwork. Homeowners can refresh the display without starting from scratch, adjusting frames or branches as needed.
The emotional payoff is real, but so are the practical considerations. Wall decor that involves multiple frames, shelves, or decals requires planning. Load-bearing capacity matters when hanging heavy frames on drywall. Humidity and sunlight can fade photos over time, especially vintage prints. These aren’t insurmountable obstacles, but they’re worth addressing upfront to avoid redoing work or damaging irreplaceable family photos.
Popular Family Tree Wall Decor Styles and Formats
Framed Photo Collages and Gallery Walls
Gallery walls remain the most versatile option. They accommodate various frame sizes, mixing 4×6, 5×7, and 8×10 frames to create visual rhythm. Frames can be matched (all black or all wood) for a cohesive look, or mixed for an eclectic vibe. The key is consistent spacing, typically 2 to 3 inches between frames, and a unifying element like mat color or frame finish.
For installation, use a paper template system: trace each frame on kraft paper, tape the templates to the wall, and adjust the layout before hammering a single nail. This prevents the Swiss-cheese effect from trial-and-error hole placement. Wall anchors rated for at least 20 pounds each handle heavier frames, especially on drywall without stud backing. If the wall has studs at 16 inches on center (standard residential framing), use those for your heaviest frames.
Shadow boxes add depth for three-dimensional keepsakes, military medals, wedding invitations, or heirloom jewelry. They typically mount with D-ring hangers and require two anchor points for stability. When mixing shadow boxes with flat frames, keep the deeper pieces at eye level or lower to avoid a top-heavy appearance.
Vinyl Decals and Wall Stickers
Vinyl decals offer a low-commitment alternative. They peel off without damaging paint (assuming the paint has cured for at least 30 days and isn’t old latex that’s already peeling). Decals come in tree silhouettes, branch outlines, or full scenes with leaves and birds. Most include circular or rectangular cutouts where framed photos hang or mount with adhesive strips.
Application requires a clean, smooth wall, wipe down with isopropyl alcohol and let dry completely. Textured walls (orange peel, knockdown, or heavy texture) reduce adhesion. The decal transfers using the hinge method: apply the top edge first, smooth from center outward with a plastic squeegee, then peel the backing while continuing to smooth. Air bubbles can be popped with a pin and smoothed flat.
For renters or anyone hesitant about wall commitment, removable fabric decals stick and restick without residue. They’re pricier than vinyl but reusable if you move or change layouts. The trade-off is slightly less crisp detail compared to high-quality vinyl. Many home crafting projects use vinyl as a starting point for more customized designs, adding painted elements or additional embellishments around the decal.
How to Plan Your Family Tree Wall Display
Start with wall measurements. Use a tape measure to establish the available width and height, accounting for furniture below (sofas, consoles, sideboards). The display should span roughly two-thirds to three-quarters the width of the furniture beneath it to feel anchored, not floating.
Sketch the layout on graph paper, using one square per inch. Mark stud locations with a stud finder, studs provide the strongest anchoring points. If studs don’t align with your design, plan to use toggle bolts or molly bolts rated for drywall. Standard drywall anchors (plastic expansion types) hold 10 to 25 pounds depending on the model: heavier frames need metal anchors or direct stud mounting.
Decide on a growth strategy. If the family tree will expand (new grandkids, future weddings), leave blank spaces or use asymmetrical layouts that accommodate additions. Symmetrical layouts look polished but lock you into a fixed pattern. Asymmetry offers flexibility, you can add a frame to the left or right without disrupting visual balance.
Gather photos and digitize fragile originals before framing. Scanning at 300 DPI preserves detail for reprints. Use acid-free mats and UV-protective glass or acrylic to prevent yellowing and fading, especially for vintage prints or photos exposed to direct sunlight. This adds $5 to $15 per frame but extends the life of irreplaceable images.
Make a materials list: frames, hanging hardware (D-rings, sawtooth hangers, wire), wall anchors, a level, painter’s tape for layout guides, and a pencil. If building a custom piece, add lumber, wood glue, sandpaper, and finish (stain or paint). Having everything on hand before starting prevents mid-project hardware store runs.
DIY Family Tree Wall Decor Projects You Can Make
Pallet wood tree: Salvaged pallet boards (typically 3.5 inches wide) can be cut, sanded, and arranged into a tree shape. Use a jigsaw to trim the top board into a curved branch, and sand all edges to remove splinters. Attach boards to a backing (1/2-inch plywood or direct to the wall using French cleats for heavy setups). Stain with Minwax Polyshades for a single-step color and finish, or paint with latex semi-gloss for a modern look. Hooks or small nails between boards hold framed photos or ornament-style picture hangers.
Rope and clothespin display: Stretch 1/4-inch or 3/8-inch natural jute rope across the wall in horizontal lines, securing ends with screw eyes anchored into studs or heavy drywall anchors. Space lines 8 to 12 inches apart. Clip photos to the rope using mini clothespins (wood or metal) for a casual, farmhouse aesthetic. This method works well for rotating photos seasonally without permanent mounting. Keep tension on the rope to prevent sagging: a turnbuckle on one end allows for tightening over time.
Wooden dowel tree sculpture: Cut 1/2-inch or 3/4-inch dowels to varying lengths (12 to 24 inches). Drill angled holes in a larger base piece (a 1×6 or 1×8 board) and insert dowels with wood glue to create a three-dimensional tree. Sand smooth and finish with Danish oil or water-based polyurethane. Attach small clips or wire loops to dowel ends to hold photos. This freestanding or wall-mounted option adds dimension and works in narrow hallways or entryways where flat displays overwhelm.
Branch and twine version: Source a real tree branch (2 to 3 inches in diameter, 3 to 5 feet long) and strip the bark if desired. Sand rough spots and seal with clear matte polyurethane to prevent insect activity and cracking. Mount the branch horizontally using heavy-duty L-brackets anchored into studs. Tie photos to the branch with twine or ribbon, or use S-hooks for easy swapping. This organic approach fits rustic or modern home decor ideas equally well, depending on the finish and photo styling.
Best Placement Ideas for Maximum Impact
Living rooms offer the most visibility. Above a sofa is classic, but avoid hanging frames so high that they float near the ceiling. The center of the grouping should sit at 57 to 60 inches from the floor (standard gallery height), which typically places the bottom edge of the lowest frame 8 to 12 inches above the sofa back.
Staircase walls provide vertical real estate that’s often underused. Arrange frames to follow the stair angle, keeping the bottom edges aligned along an invisible diagonal line parallel to the stair rail. Use a laser level or chalk line to establish that guide. Mounting on stairs requires hitting studs or using robust anchors, since angled walls make leverage trickier.
Hallways and entryways work well for narrower displays. A single vertical column of frames or a slim tree decal fits without crowding. In tight spaces, shallow frames (3/4-inch depth or less) reduce the risk of shoulder bumps. If the hallway gets heavy traffic, skip protruding shadow boxes.
Home offices and dens suit smaller, more intimate family trees. A single shelf with leaning frames or a desktop easel tree keeps the display personal without dominating the workspace. Consider lighting, picture lights or LED strip lighting mounted above frames add warmth and highlight details, especially in rooms with limited natural light.
Avoid placing family photos in bathrooms (humidity warps frames and fades photos) or kitchens (grease and steam damage). Direct sunlight from south or west-facing windows accelerates fading: if that’s unavoidable, rotate photos periodically or use UV-blocking acrylic glazing. Many step-by-step DIY project tutorials detail methods for protecting photos in challenging light conditions using museum-grade materials.