
Table of Contents
ToggleA blank patio wall is wasted real estate. Whether it’s stucco, siding, brick, or fiber cement, that vertical surface can anchor your outdoor living area, define zones, and extend your home’s personality beyond the back door. Unlike interior walls, patio walls face sun, rain, wind, and temperature swings, so the approach is different. The right decor needs to withstand the elements while delivering visual impact. This guide covers weather-resistant materials, installation methods, and project ideas that work for renters and homeowners alike, from weekend-friendly DIY builds to pieces that require anchoring into masonry or framing.
Key Takeaways
- Patio wall decor transforms blank outdoor walls into functional focal points that define zones, conceal damage, and reflect light while withstanding weather and UV exposure.
- Weather-resistant materials like powder-coated steel, ceramic tile, and marine-grade wood outperform traditional interior decor and require proper fasteners matched to wall type—studs for wood-framed walls and masonry anchors for brick or concrete.
- Vertical gardens and living walls add greenery while distributing weight safely; a 4×4-foot saturated living wall can weigh 80–120 pounds, requiring anchors rated for shear load.
- DIY patio wall projects like framed mirrors, succulent planters, and stenciled murals are achievable weekend tasks that deliver visual impact without professional installation.
- Before drilling, locate studs with a stud finder, check for hidden utilities, and use painter’s tape to visualize spacing—proper layout and quality fasteners ensure your patio wall decor lasts for years.
Why Patio Wall Decor Matters for Your Outdoor Space
Outdoor walls serve functional and aesthetic roles. A well-decorated patio wall can:
- Define spatial zones without the cost or permanence of a privacy fence or pergola
- Conceal wear and damage on aging siding, cracked stucco, or discolored brick
- Reflect light into shaded areas using mirrors or metallic finishes
- Support vertical plantings that improve air quality and soften hardscape
- Create focal points that anchor furniture layouts and sightlines
From a design standpoint, patio walls are transitional surfaces, not quite indoors, not entirely landscape. They need decor that bridges architecture and garden, which is why traditional interior approaches (like framed prints or canvas art) rarely hold up outdoors. Instead, materials like powder-coated steel, marine-grade wood, ceramic tile, and UV-stabilized resin deliver longevity without frequent replacement.
Structurally, understanding what’s behind the wall matters. If you’re mounting heavy planters, metal sculptures, or large mirrors, you’ll need to locate studs (for wood-framed walls) or use masonry anchors rated for the load. Cosmetic pieces under 10 pounds can often hang on surface hooks or adhesive mounts, but anything heavier requires proper fasteners to prevent pull-out or surface damage.
Best Patio Wall Decor Ideas for Every Style
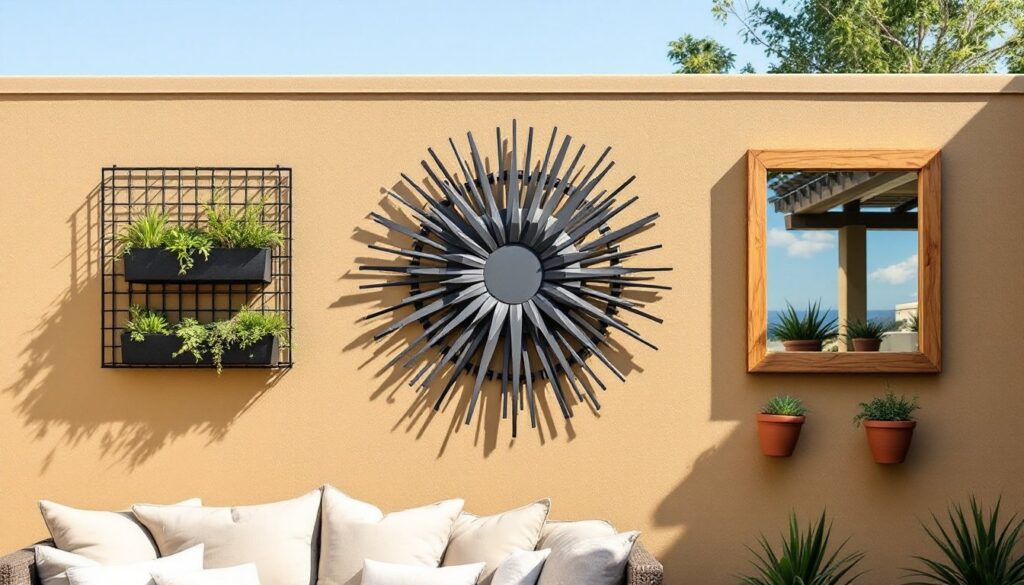
Outdoor Wall Art and Sculptural Elements
Metal wall art remains a top choice for patios because powder-coated steel and aluminum resist rust and UV fade. Look for pieces with a baked enamel finish or marine-grade coating. Sculptural sunbursts, geometric panels, and laser-cut botanical designs add depth without overwhelming smaller patios. For coastal or high-humidity zones, stainless steel or galvanized finishes outperform plain steel.
Ceramic and mosaic tile murals work well on stucco or masonry walls. Use thinset mortar rated for exterior use (ANSI A118.4 or A118.15 for freeze-thaw climates) and seal grout lines with a penetrating sealer to prevent water infiltration. Tile adds color permanence that painted surfaces can’t match.
Outdoor mirrors expand perceived space and bounce light into dim corners. Choose acrylic mirrors for safety and lighter weight, or tempered glass mirrors with a protective backing. Frame them in weather-resistant wood (like teak or cedar) or powder-coated metal. Position mirrors to reflect plantings or sky, not direct sun, which can create glare or even ignite dry materials nearby.
Driftwood and reclaimed wood sculptures bring organic texture, but require annual sealing with a penetrating oil or marine spar varnish to prevent splitting and rot. Avoid direct ground contact and ensure drainage behind the piece to extend its lifespan.
Vertical Gardens and Living Walls
Modular planter systems mount directly to walls using French cleats or heavy-duty L-brackets. Products like felt pocket planters or rigid plastic grid systems distribute weight and allow root aeration. Choose planters with built-in drainage or add weep holes to prevent waterlogging.
When installing vertical gardens, consider the wall’s load capacity. A 4×4-foot living wall can weigh 80–120 pounds when saturated, so fasteners must hit studs (for wood-framed walls) or use masonry anchors rated for shear load in brick or concrete.
Plant selection drives maintenance. For full-sun walls, succulents, sedums, and trailing rosemary thrive with minimal irrigation. Shaded walls suit ferns, hostas, and moss varieties. Drip irrigation or soaker lines reduce hand-watering, but require a backflow preventer if connected to household water.
Trellis and espalier frameworks offer a lower-cost alternative to modular systems. Mount a cedar or metal trellis 2–3 inches off the wall using spacers to allow air circulation behind climbing vines. This prevents moisture trapping and staining on siding. Train jasmine, clematis, or climbing hydrangea for seasonal blooms, or use evergreen ivy for year-round coverage. Many gardeners find inspiration for creative wall planting arrangements that balance aesthetics and plant health.
Choosing Weather-Resistant Materials for Patio Walls
Not all outdoor-rated materials perform equally. Here’s how common options stack up:
- Powder-coated steel and aluminum: Resists rust and UV fade. Recoat every 5–7 years in coastal zones.
- Teak, cedar, and redwood: Naturally rot-resistant. Apply penetrating oil annually or let weather to gray.
- Marine-grade plywood with exterior paint: Budget-friendly but requires repainting every 2–3 years. Use exterior-grade primer and acrylic latex topcoat.
- PVC and composite trim: Won’t rot or warp. Limited color options, but zero maintenance beyond occasional washing.
- Ceramic and porcelain tile: Freeze-thaw stable if rated for outdoor use (ASTM C1026). Seal grout to prevent efflorescence.
- Galvanized or stainless steel: Best for high-moisture areas. Heavier and pricier than powder-coated options.
- Outdoor-rated fabric (Sunbrella, solution-dyed acrylic): For hanging banners or textile art. Remove during winter in cold climates to prevent mildew.
Finish matters as much as material. UV inhibitors in paint and stain prevent chalking and fading. For wood, film-forming finishes (like spar varnish) offer high gloss but require sanding and recoating. Penetrating oils (tung oil, linseed oil) enhance grain and are easier to renew, but provide less surface protection.
In regions with freeze-thaw cycles, avoid trapping water behind decor. Use standoff brackets, French cleats with ventilation gaps, or Z-clips that space the piece 1–2 inches from the wall. This airflow prevents ice expansion damage and staining on porous surfaces like stucco or brick.
DIY Patio Wall Decor Projects You Can Try This Weekend
Project 1: Framed Outdoor Mirror with Cedar Trim
Materials: 24×36-inch acrylic mirror, 1×4 cedar boards, exterior wood glue, stainless steel screws, French cleat hardware, penetrating wood sealer.
- Cut cedar to frame the mirror, mitering corners at 45 degrees (a miter saw gives cleaner cuts than a circular saw).
- Assemble the frame with glue and 1¼-inch stainless screws. Pre-drill to prevent splitting.
- Secure the mirror inside the frame using mirror clips or a bead of silicone adhesive.
- Apply two coats of penetrating sealer. Let dry 24 hours between coats.
- Mount a French cleat to the back of the frame and the corresponding piece to the wall, hitting at least two studs.
Project 2: Modular Succulent Wall Planter
Materials: 4×4-foot sheet of ¾-inch exterior plywood, 12–16 terra cotta pots (4-inch diameter), galvanized pipe straps, exterior primer and paint, masonry anchors or lag screws.
- Cut plywood to size. Sand edges and apply one coat of exterior primer, then two coats of acrylic latex paint in a UV-resistant formula.
- Arrange pots on the plywood in a staggered pattern. Mark placement for pipe straps.
- Attach each pot using two galvanized pipe straps per pot, screwing through the plywood.
- Mount the plywood to the wall using lag screws into studs or masonry anchors rated for 150+ pounds shear load.
- Fill pots with cactus mix and plant succulents. Water sparingly, these planters drain quickly.
Project 3: Stenciled Concrete Patio Wall Mural
Materials: Concrete wall, exterior acrylic paint, large stencil (vinyl or mylar), painter’s tape, foam rollers, exterior sealer.
- Clean the wall with a pressure washer (1500–2000 PSI) and let dry 48 hours.
- Tape the stencil in place. Use repositionable spray adhesive on the back to prevent paint bleed.
- Apply paint with a foam roller using a stippling motion. Two thin coats prevent drips.
- Remove the stencil carefully and let the paint cure for 72 hours.
- Seal with a clear masonry sealer to protect against moisture and UV. Surfaces treated this way often become conversation pieces, much like the bold color palettes and design choices featured on platforms focused on modern living.
How to Arrange and Install Patio Wall Decor Safely
Safety and PPE: Wear safety glasses when drilling into masonry or cutting metal. Use work gloves for handling sharp-edged decor and hearing protection if operating a hammer drill or impact driver for extended periods. When working overhead, a dust mask prevents inhalation of concrete dust or wood particles.
Fastener selection by wall type:
- Wood-framed walls (siding, sheathing): Locate studs with a stud finder. Use 3-inch lag screws or GRK structural screws for heavy items. For lighter pieces, #10 wood screws into studs work fine.
- Brick or block walls: Use sleeve anchors or wedge anchors rated for masonry. Pre-drill with a carbide masonry bit, sized to the anchor manufacturer’s spec.
- Stucco over wood framing: Drill through stucco into studs. Use a pilot hole to prevent stucco cracking, then drive lag screws.
- Concrete or CMU walls: Tapcon screws or expansion anchors work well. A rotary hammer drill speeds the process but isn’t required for a few holes.
Layout tips: Before drilling, arrange decor on the ground to visualize spacing. Use painter’s tape on the wall to mark positions. For gallery-style arrangements, start with the largest piece at eye level (approximately 60 inches from the ground) and build outward. Maintain 4–6 inches of space between pieces to avoid a cluttered look.
Weight distribution: For items over 25 pounds, use two fasteners spaced horizontally to prevent tilting. French cleats distribute weight evenly and allow easy leveling. Z-clips work similarly but mount flush against the wall.
Electrical and plumbing awareness: Before drilling, check for hidden utilities. Exterior walls may contain electrical conduit, water lines, or gas piping. Use a multiscanner (detects metal and AC voltage) if you’re unsure. If the wall backs onto an interior bathroom or kitchen, be extra cautious.
Permit considerations: Cosmetic wall decor rarely requires permits. But, if you’re altering structural elements (cutting into load-bearing walls, adding large built-in planters with irrigation tie-ins), check local codes. Some jurisdictions treat permanent outdoor structures over a certain size as requiring plan approval.
Patio decor installation is straightforward when you match fasteners to wall construction and respect weight limits. Many homeowners draw from regional design traditions, ideas that echo the approachable, porch-centered style celebrated by publications rooted in Southern home culture adapt well to patios nationwide. Take your time with layout, use quality fasteners, and your patio wall will anchor your outdoor space for years.